Picture this: you’ve arrived at the beach, ready to enjoy a day with Solbello. The sun is perfect, the waves are calling, and the day is full of promise. But first, the setup. You pull out your beach umbrella, a tangled mess of poles and fabric that you’ve wrestled with a hundred times. You struggle to screw it into the sand, only for the first strong gust of wind to send it cartwheeling down the shore. Or perhaps you have a pop-up tent with confusing instructions and more poles than you know what to do with. The frustration builds, and your relaxing day is already off to a stressful start.
We’ve all been there. That pre-beach-bliss dread is real. But what if setting up your sanctuary of shade was the easiest, most satisfying part of your day?
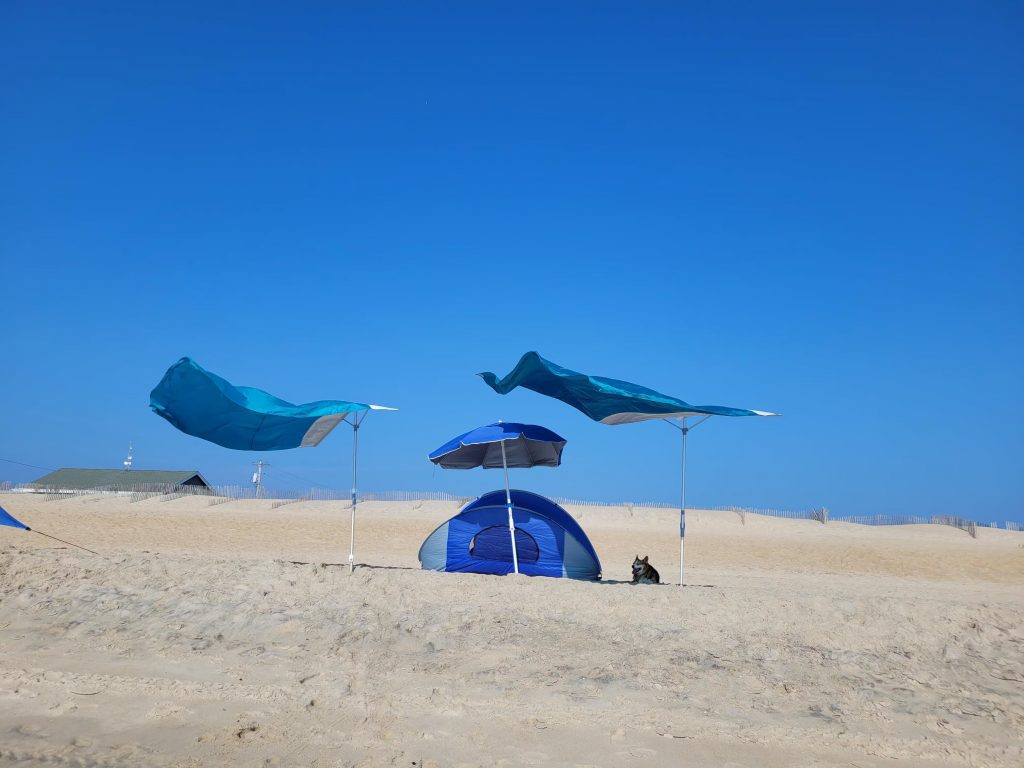
Enter the Solbello. This isn’t just another beach umbrella; it’s a revolutionary, wind-driven beach shade designed to eliminate setup frustration for good. It boasts UPF 50+ protection and a unique design that works with the wind, not against it. Its biggest claim? A setup time of under three minutes.
It sounds too good to be true, but we’re here to prove it. This guide will walk you through, step-by-step, just how incredibly simple the Solbello is to assemble. Say goodbye to beach setup anxiety and hello to more time enjoying the sun, sand, and surf.
Understanding the Solbello Difference Before You Begin
Before we start the timer on our three-minute challenge, let’s quickly break down what makes this product a true piece of innovative beach gear. Unlike traditional shades that present a flat surface to the wind, creating lift and instability, the Solbello uses a clever, aerodynamic design. This isn’t just a feature; it’s the core of its genius.
The Magic of Wind-Powered Stability
The secret is in its self-adjusting canopy. The Solbello is designed to pivot and move with the breeze. When the wind blows, instead of catching and threatening to fly away, the canopy simply adjusts its position to remain stable and grounded. It harnesses the wind’s own energy to keep itself in place. This means no more frantic dashes down the beach to retrieve your runaway umbrella. It’s a hassle-free beach shade that provides peace of mind along with physical shade.
A True One-Person Beach Setup
Many products claim to be a one-person setup, but the reality often involves awkward balancing acts and a desperate wish for an extra pair of hands. The Solbello delivers on this promise. The entire system is lightweight, compact, and intuitively designed. The simple components and straightforward process mean that anyone—from a solo beachgoer to a parent juggling kids and gear—can have it up and ready in moments. This is the new standard for a quick beach tent.
What’s Inside the Solbello Bag?
When you first open your Solbello carrying bag, you won’t be overwhelmed by a dozen different parts. The beauty is in its simplicity. Inside, you will find:
- The Main Canopy (with the attached sandbag)
- A two-piece, shock-corded Aluminum Pole
- The lightweight, compact carrying bag itself.
That’s it. No complicated frame, no confusing collection of stakes, and no guy lines to trip over. Everything is designed for purpose and ease. Seeing these minimal components is the first clue that this will be the easiest beach setup you’ve ever experienced.
How to Set Up Your Solbello: The Official 3-Minute Challenge
Alright, it’s time to put the claim to the test. Find a comfortable spot on the sand, take a deep breath, and let’s get your oasis set up. We’ll break down the Solbello instructions into five simple, foolproof steps.
Step 1: Find Your Spot and Point Into the Wind (Approx. 30 seconds)
First, lay the entire Solbello on the sand with the canopy fabric spread out. The most crucial part of this step is orientation. You want to identify the direction the wind is coming from. The goal is to have the pole at the front, with the long tail of the canopy and the sandbag trailing downwind.
Think of it like a weather vane. The pole is the pivot point, and the wind should flow over it and across the canopy. This initial positioning does 90% of the work for you, allowing the shade to function exactly as designed.
Step 2: Plant Your Anchor Pole (Approx. 45 seconds)
Now, take the two-piece aluminum pole and connect them. They snap together easily thanks to the internal shock cord. With the pole assembled, drive the pointed end firmly into the sand at the spot you chose.
The best technique is a simple back-and-forth twisting motion while applying downward pressure. You don’t need superhuman strength. Screw it down until it feels secure and stable. This pole is the single anchor point for your entire shade structure. It’s the foundation of your hassle-free beach shade experience.
Step 3: Fill the Single Sandbag (Approx. 60 seconds)
Here’s where you’ll really appreciate the Solbello design. Instead of having to fill four separate sandbags at each corner like many beach tents, you only have one. Open the attached sandbag at the far end of the canopy.
Use your hands or a small shovel to scoop sand into it. You don’t need to pack it down aggressively; just fill it until it’s mostly full. This sand-filled bag acts as a weighted tail, providing the primary resistance that keeps your shade from taking flight. It’s the engine that harnesses the wind. Once filled, simply close the top using the secure velcro strips.
Step 4: Attach the Canopy and Let It Fly (Approx. 30 seconds)
Walk back to the pole with the front of the canopy. You will see a reinforced grommet and a simple attachment system. Place the grommet directly over the top of the pole. There’s a small ball at the top of the pole that holds it securely in place.
This is the magic moment. The instant you place the canopy on the pole, the wind will catch the fabric. The canopy will lift, inflate, and float into position. It will automatically pivot and align itself perfectly with the wind direction. It’s a truly satisfying sight and the ultimate proof of this incredible Solbello tutorial.
Step 5: Adjust for Shade and Relax (Approx. 15 seconds)
Your Solbello is now up and providing a generous patch of UPF 50+ shade! The final step is simply to adjust its position for your needs. To change the location of the shade, you can gently tug on the sandbag to shift the canopy’s angle. You can move your chair and gear underneath and settle in.
That’s it. You’re done. Look at your watch—chances are, you’ve easily beaten the three-minute mark. You’ve just completed the Solbello assembly with zero stress.
Why Easy Solbello Assembly Transforms Your Beach Day
This isn’t just about saving a few minutes. The profound ease of the Solbello setup has a ripple effect that enhances your entire beach experience, making it a must-have piece of portable beach gear.
More Time for Relaxation, Less Time on Logistics
Every minute you save on tedious setup is a minute you gain for what you came to the beach for relaxing, reading, swimming, or playing with your family. The Solbello gives you back that precious time. The calm, effortless assembly sets a positive tone for the rest of your day.
The Perfect Shade for Solo Trips and Families
Because it’s a genuine one-person setup, the Solbello is the ideal companion for solo beachgoers who don’t have an extra set of hands. It’s equally brilliant for parents who need to keep one eye on the kids while getting their home base established. Its lightweight nature means it’s not a burden to carry from the car, even with all your other gear. It’s versatility and simplicity at its finest. If you need a reliable option, you can also check it out on the Solbello Amazon store.
Packing Up Your Solbello: Just as Quick and Painless
A great product experience doesn’t end with setup; it has to be easy to pack away, too. The fear of not being able to get a tent back into its impossibly small bag is a real concern. Thankfully, the Solbello user manual for packing up is just as simple.
- Lift & Detach: Simply lift the canopy off the pole. The shade will immediately fall gently to the sand.
- Empty the Sandbag: Open the velcro on the sandbag and tip out the sand. Shake it a few times to get most of it out.
- Fold & Roll: Fold the canopy lengthwise a few times. Place the collapsed pole at one end and roll the fabric tightly around it.
- Bag It: Slide the rolled-up bundle back into the Solbello bag. It’s designed with plenty of room, so you won’t have to fight it.
The entire pack-up process takes less than two minutes, ending your beach day on the same stress-free note it began with.
Your Best Beach Day is Waiting
The days of wrestling with cumbersome beach umbrellas and baffling tent poles are over. The Solbello has redefined what it means to have easy, reliable, and effective beach shade. Its brilliant wind-powered design, UPF 50+ protection, and, as we’ve demonstrated, its ridiculously fast and easy setup make it an essential investment for any beach lover. You’re not just buying a beach shade; you’re buying more time, less stress, and perfect, worry-free beach days.
Ready to experience the easiest setup on the sand?
Click here to get your own Solbello today!
And don’t forget to visit our exclusive Solbello coupon page to grab a special discount before you complete your purchase. Happy beaching!